How to Install CPVC Pipe Using Solvent Cement
Unlike green pipe (PPR) and metal pipes, which require heat and flame to weld joints together, FlowGuard® CPVC pipe and fittings use a process called solvent cement welding.
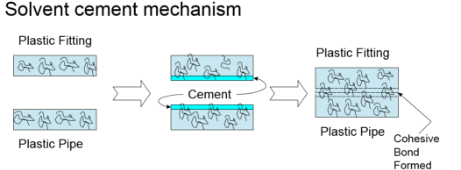
Solvent cement welding is a fast, safe process that fuses a pipe and fitting together at the molecular level, creating a permanent joint that becomes the strongest part of the system.

When it comes to residential hot and cold plumbing systems, contractors prefer solvent cement because it's reliable and is easy to do, saving time and money. Simply following the instructions below, anyone—contractor or homeowner—can effectively assemble a CPVC piping system.
Step 1: Cut the Pipe
Square cuts are essential for CPVC installation. It ensures a maximum bonding surface. You can use a circular saw, miter saw, hand saw or ratchet cutter to cut CPVC piping. Whichever you choose, make sure the blade is fine toothed (6 to 7 per centimeter) and sharp.
For hand saws and ratchet cutters, be sure to use a guide to ensure a square cut.
If the pipe is cracked or damaged during the cut, measure five centimeters from the crack and re-cut. For more on cutting CPVC pipe, click here.
Step 2: Prepare the Pipe and Fittings
Use a file or small pocket knife to remove all filings and scrap from the pipe end. Then, take sandpaper and create a slight bevel along the pipe edge. This prevents solvent cement from being pushed down the fitting.
Check that the pipe fits at least ⅔ of the way into the fitting before applying any solvent cement.
Step 3: Apply the Solvent Cement
Prior to solvent cementing, it is recommended to use a primer. Once primer is applied, use a dauber that is no more than half the width of the pipe to apply the solvent cement, but check the manufacturer’s manual for specific instruction.
Apply a heavy, even coat of solvent cement to the outside of the pipe. Then, without re-dipping, apply a thin, even coat to the inside of the fitting. Check to make sure there are no drips.
Step 4: Assemble the Joint
Insert the pipe into the fitting as soon as possible. Depending on the temperature and humidity, solvent cement can evaporate quickly. If for some reason there’s a delay and the solvent cement is no longer wet, the previous solvent cement layer can be removed with sandpaper. Then a new layer can be applied without compromising the joining process.
After inserting the pipe into the fitting, verify that it reaches all the way to the end of the fitting. Hold in place for 5-10 seconds to allow the union to set. This time will vary based on environmental conditions.
Step 5: Give the Joint Proper Time to Cure and Dry
Curing is the process of solvents evaporating out of the joint. After all the solvent is gone, the joint is finished and ready for testing.
Cure times are a function of pipe diameter, humidity, and temperature, so check the solvent cement manufacturer’s instructions for cure times.
More FlowGuard CPVC Installation Resources
Looking for more information on installing FlowGuard CPVC pipe in residential plumbing applications? Check out these helpful resources:
- FlowGuard Pipe and Fittings Installation Guide: For more in-depth instructions on cutting, deburring, joining and assembling CPVC pipe and fittings
- How to Properly Cut CPVC Pipe
- Why Installing CPVC Plumbing Systems Saves Time and Money
For questions about FlowGuard CPVC, contact our team of piping systems consultants.

